Authentication Antics
The Complexity of User Registration and Authentication
Mapping out the process of user registration, user login and password reset let me rediscover the quirks and delights of the process. Here's my unnecessarily detailed description with wireframes and flowcharts of something we take for granted.
October 2023

Jumping into the Authentication Flow
(image: envato.com)
Nowadays frameworks provide all sorts of middleware for user registration and authentication. This hides the complexities of the process from developers. They'd rather work on the really interesting parts of an application and don't want to keep implementing the same solved problems.
It it's easy to forget the delightful quirks and intricate complexities that lie beneath the surface. In this exploration, we embark on a short journey to rediscover the charm and intricacies of user registration and login. At a course I reacently attended, we had to map out the process with as many details as possible. It was an amusing and enlightening exercise. In the following I'd like to share what I came up with.
About this Concept
This is a detailed description of registration, login and authentication for the hypothetical web application or website xyz.com. It was created purely for excercise purposes.
This process requires three different components:
- Frontend (client side)
- Captcha service
- Backend (server side)
User journey
1. Registration
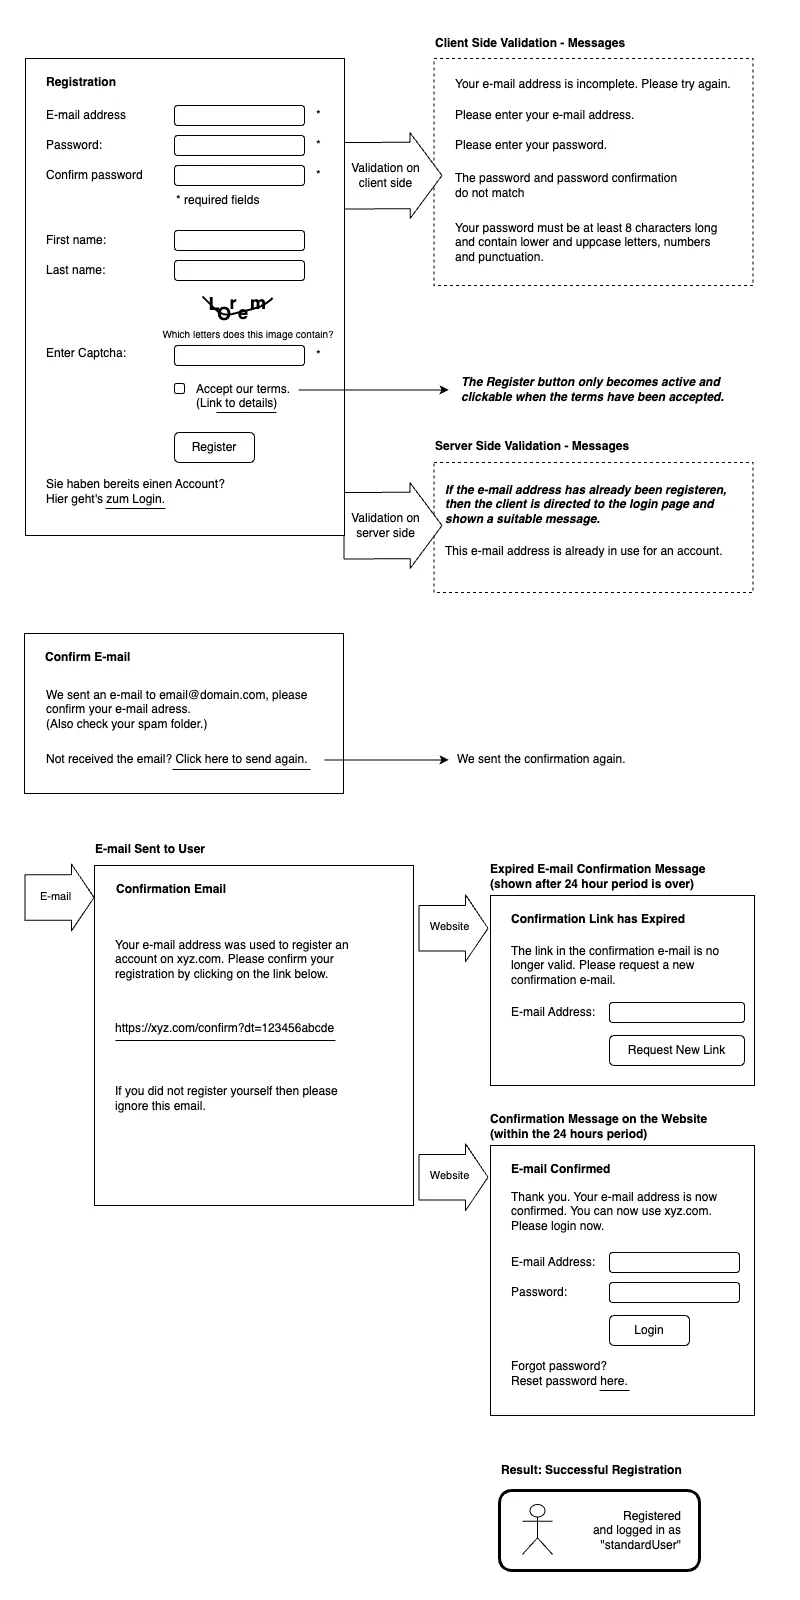
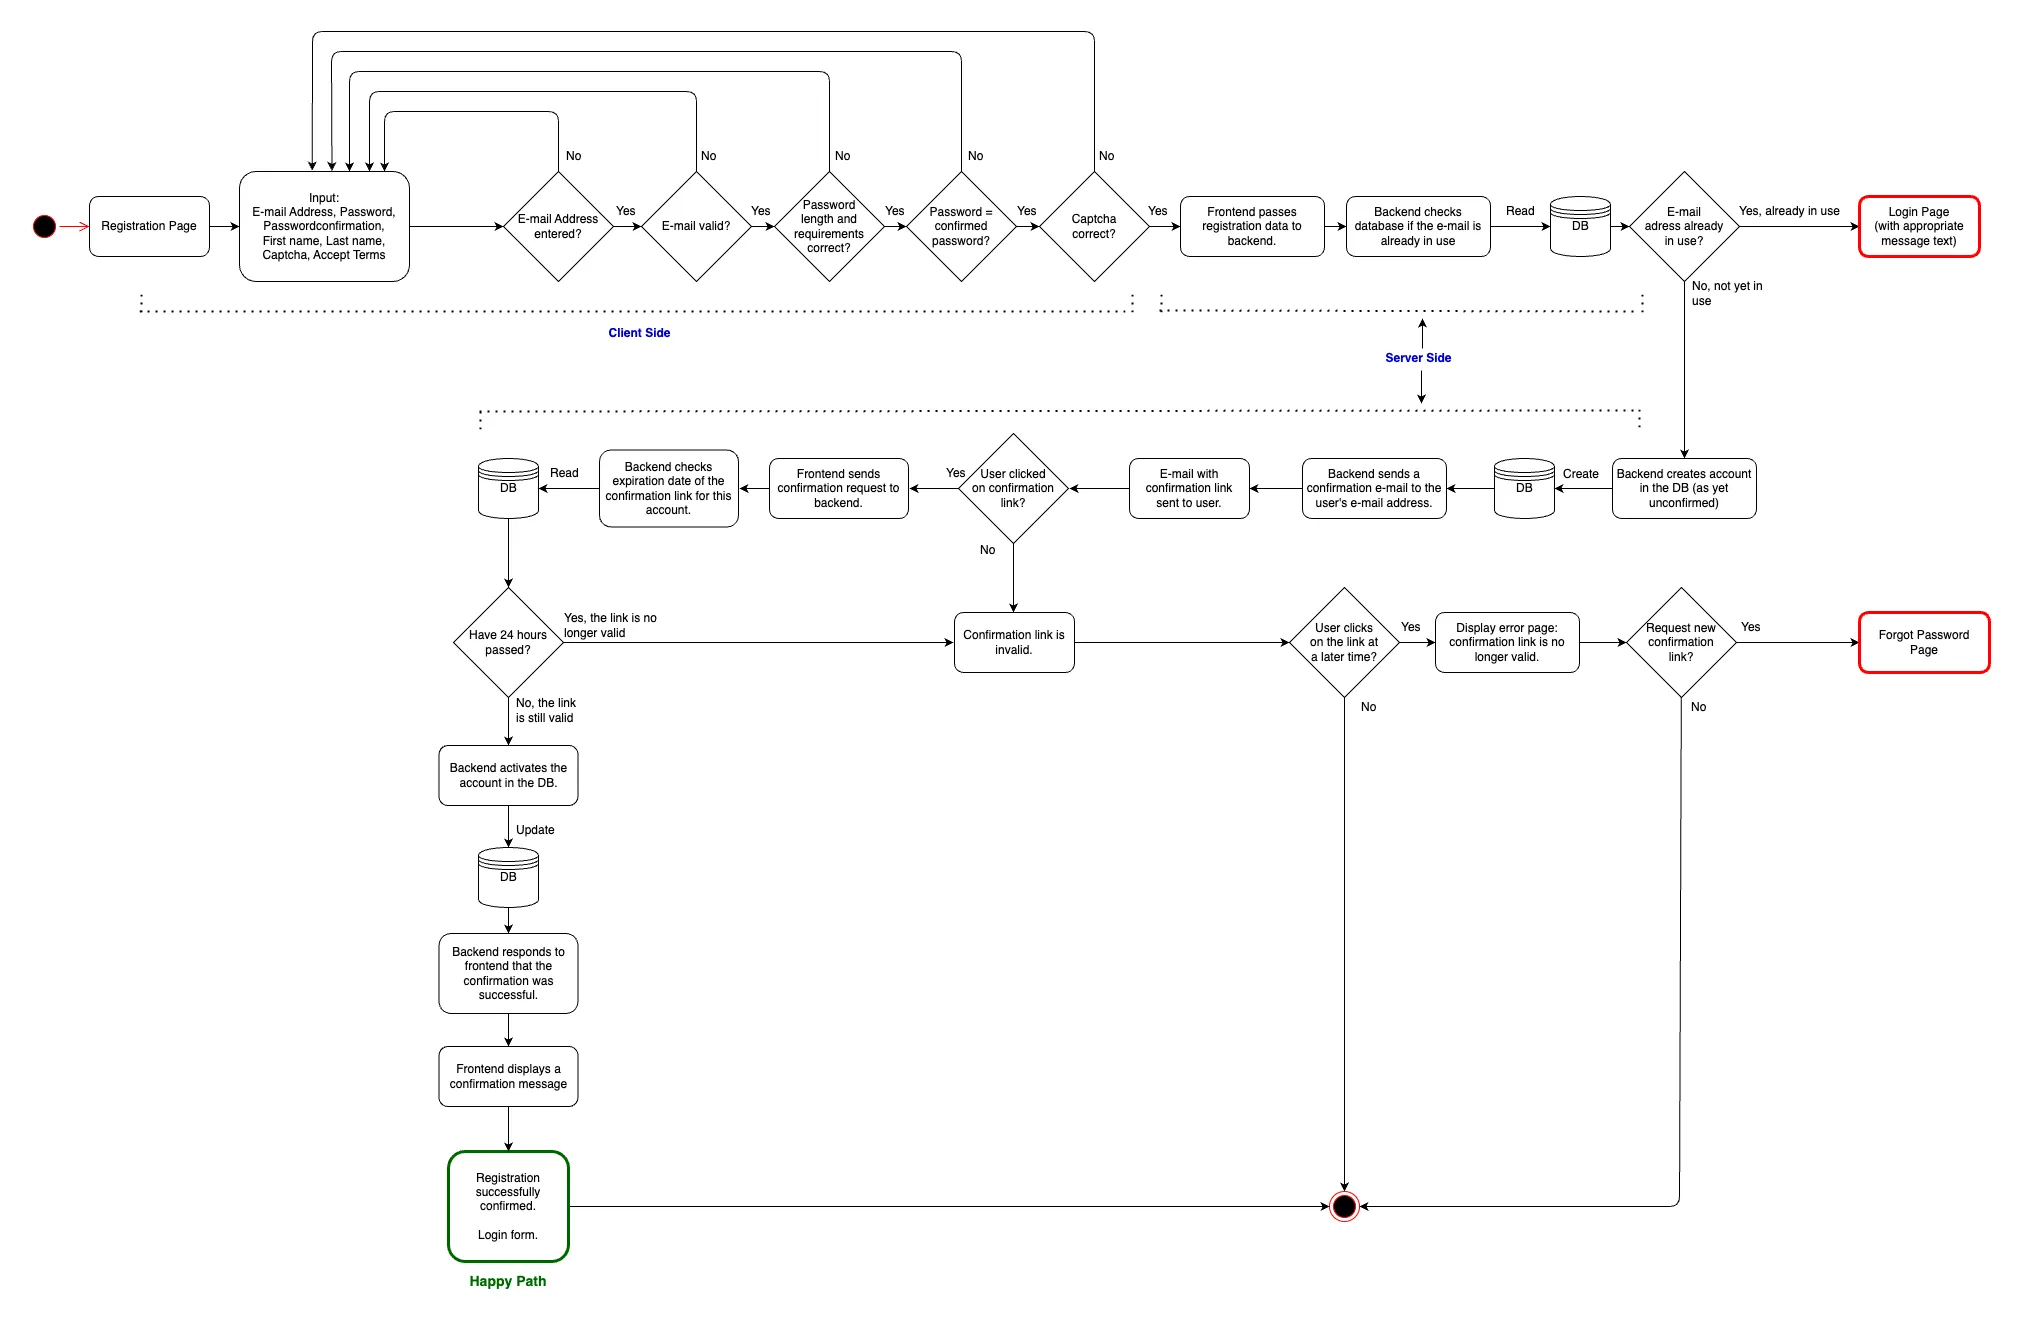
Registration of a new user with their email address and password for the web app xyz.com. The password must meet the minimum requirements (min. 8 characters in length, mixed letters/numbers/special characters). The backend does not store the password in plain text, but only in hashed form. After successful registration, a confirmation email is sent to the email address provided. Registration is only completed after clicking the confirmation link.
A. Entering the credentials: The user enters the following information.
- E-mail address
- Password (and password confirmation)
- Captcha (generated image with deformed text content that the user has to enter)
- Optional: first name and last name.
- Accept terms and conditions (the submit button only becomes active if the terms and conditions have been accepted)
Please note: The captcha service here could be its own implementation (e.g. with its own Node.js server), or an external service. For security reasons, Google reCaptcha is not recommended here. But there are also other Captcha services that are not from Google.
B. Client-side validation: The information entered in the form is validated on the client side before sending:
- Check for valid email format.
- Check the password for minimum requirements (min. 8 characters long, mixed letters/numbers/special characters).
- Check whether the password and the password confirmation match.
- Check whether the captcha text was entered correctly.
C. Server-side validation: The server validates the information entered:
Check whether this email address is already in use. If the email address is already in use, a corresponding message will be displayed and redirected to the login page.
D. Password hashing: The password entered is never stored in plain text. Instead, it is hashed using a cryptographic hashing algorithm (e.g. bcrypt).
E. Database Storage: The hashed version of the password and the user's email address are stored in the database.
F. Confirmation email: An email with a confirmation link will be sent to the address provided. If the user clicks on the link in the email, a confirmation page will open, thus the registration is completed. The user can now log in with her email address and password.
However, the link loses its validity after 24 hours. If the user clicks the link after its expiry, a page with an error message will be displayed and the option to reset the password will be given.
Wireframes: Registration
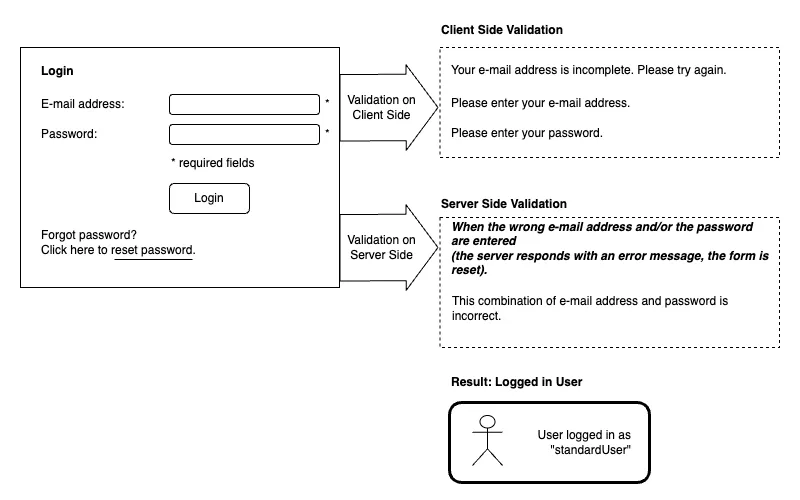
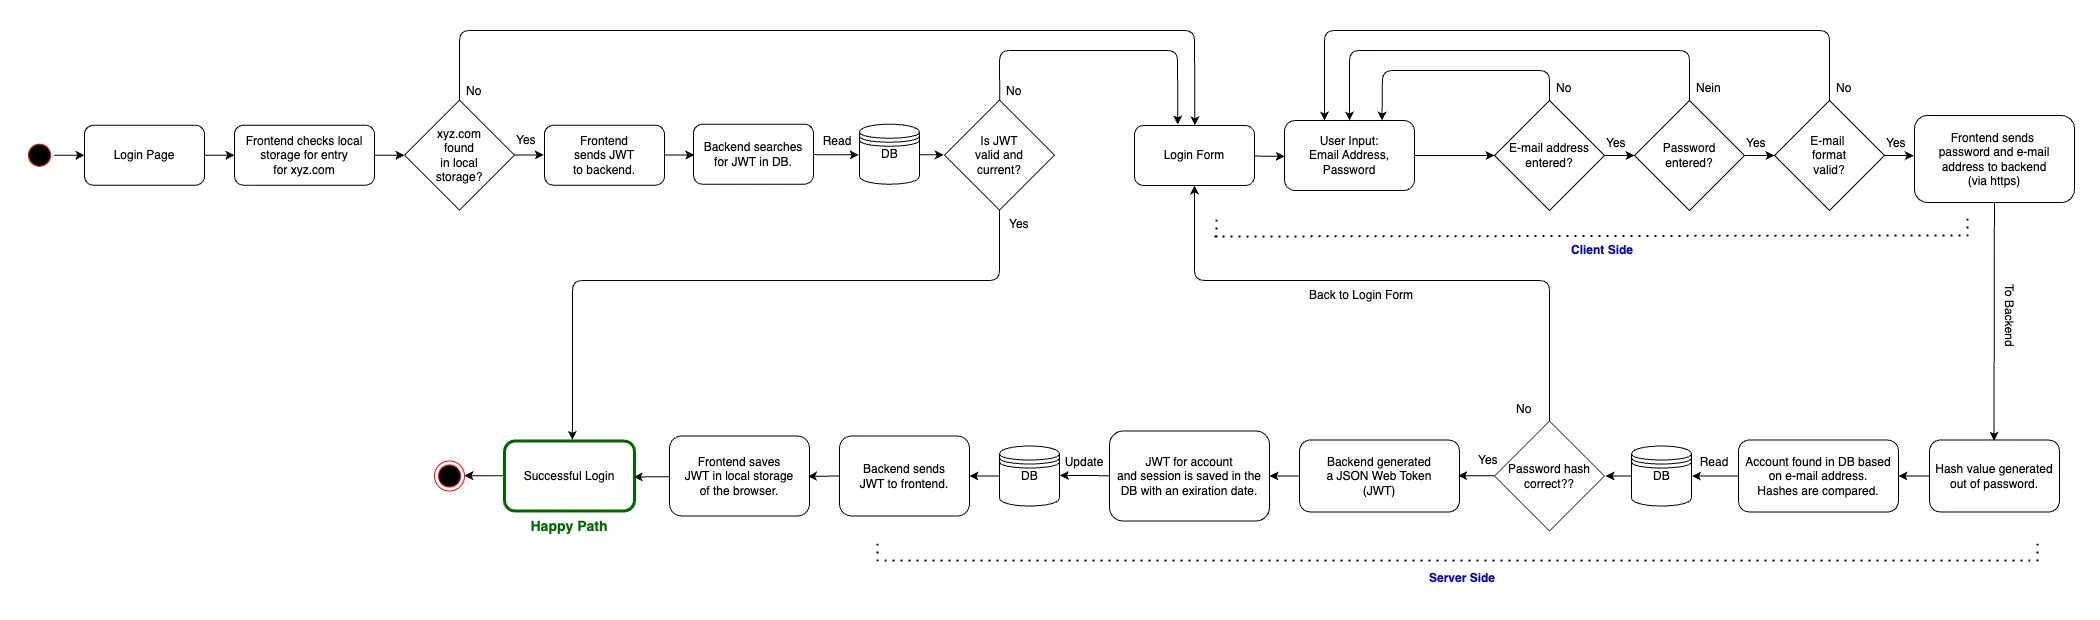
2. Login
The user can log in with her email address and password. After successful registration, a session will be created for the user. At this point it is also checked whether the user is already logged in. To do this, the JWT token is read from the client's local storage and sent to the server. The server checks the token and decides whether the request is allowed or not. If not, then the client remains on the login page.
A. Entering credentials: The user enters her email address and password. At this point it is checked whether the client has a valid and current JWT token stored in LocalStorage. If yes, then this will be sent to the server and the user will be logged in automatically.
B. Database query: The server searches the database for the hashed version of the entered password and email address.
C. Password verification: The server compares the hashed password in the database with the hashed value of the entered password. If there is a match, authentication is successful.
D. Session creation: If authentication is successful, the server creates a session for the user. This is achieved using a JWT (JSON Web Token).
E. JWT token: The server sends the JWT token to the client. This is stored in the client's local storage and sent to the server with every request.
Wireframes: Login
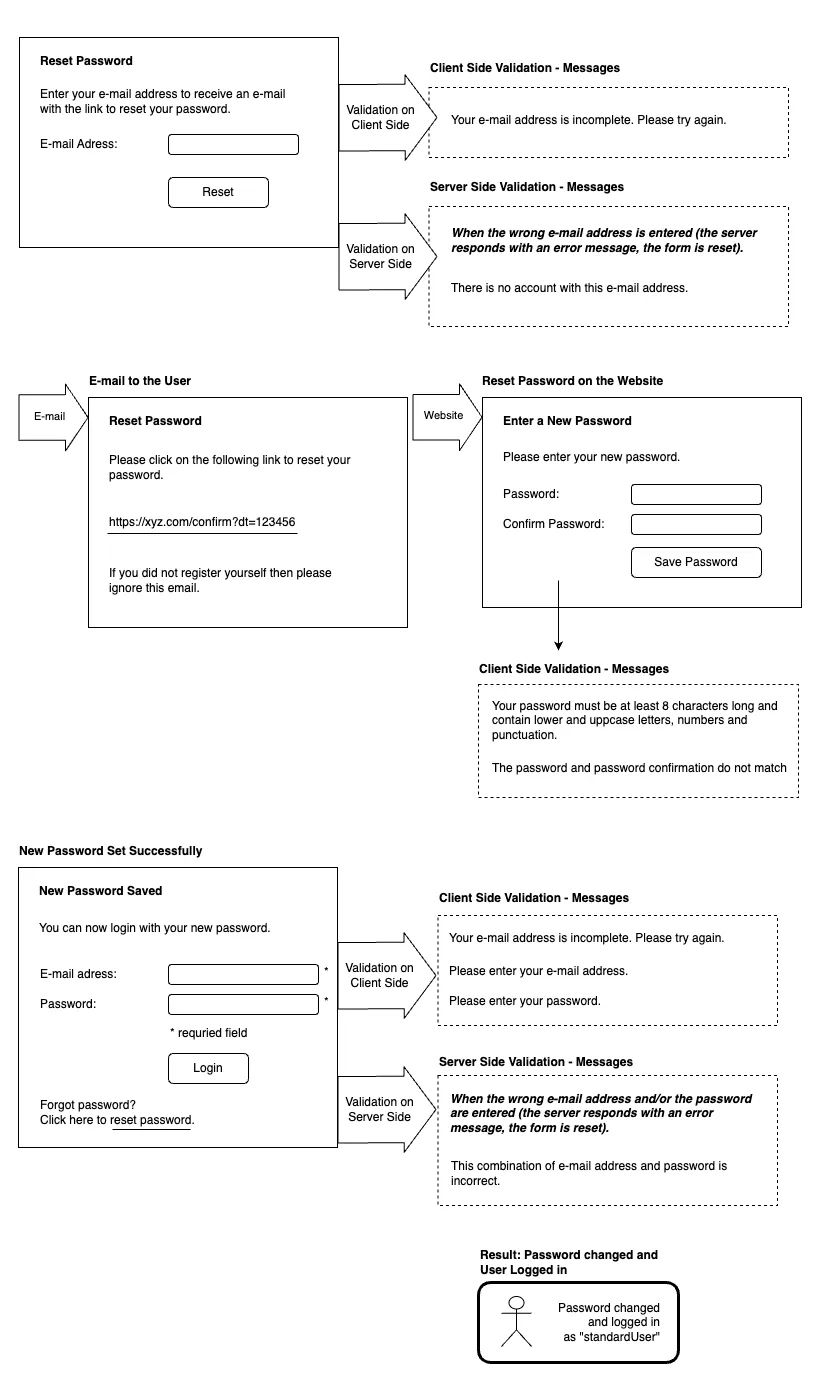
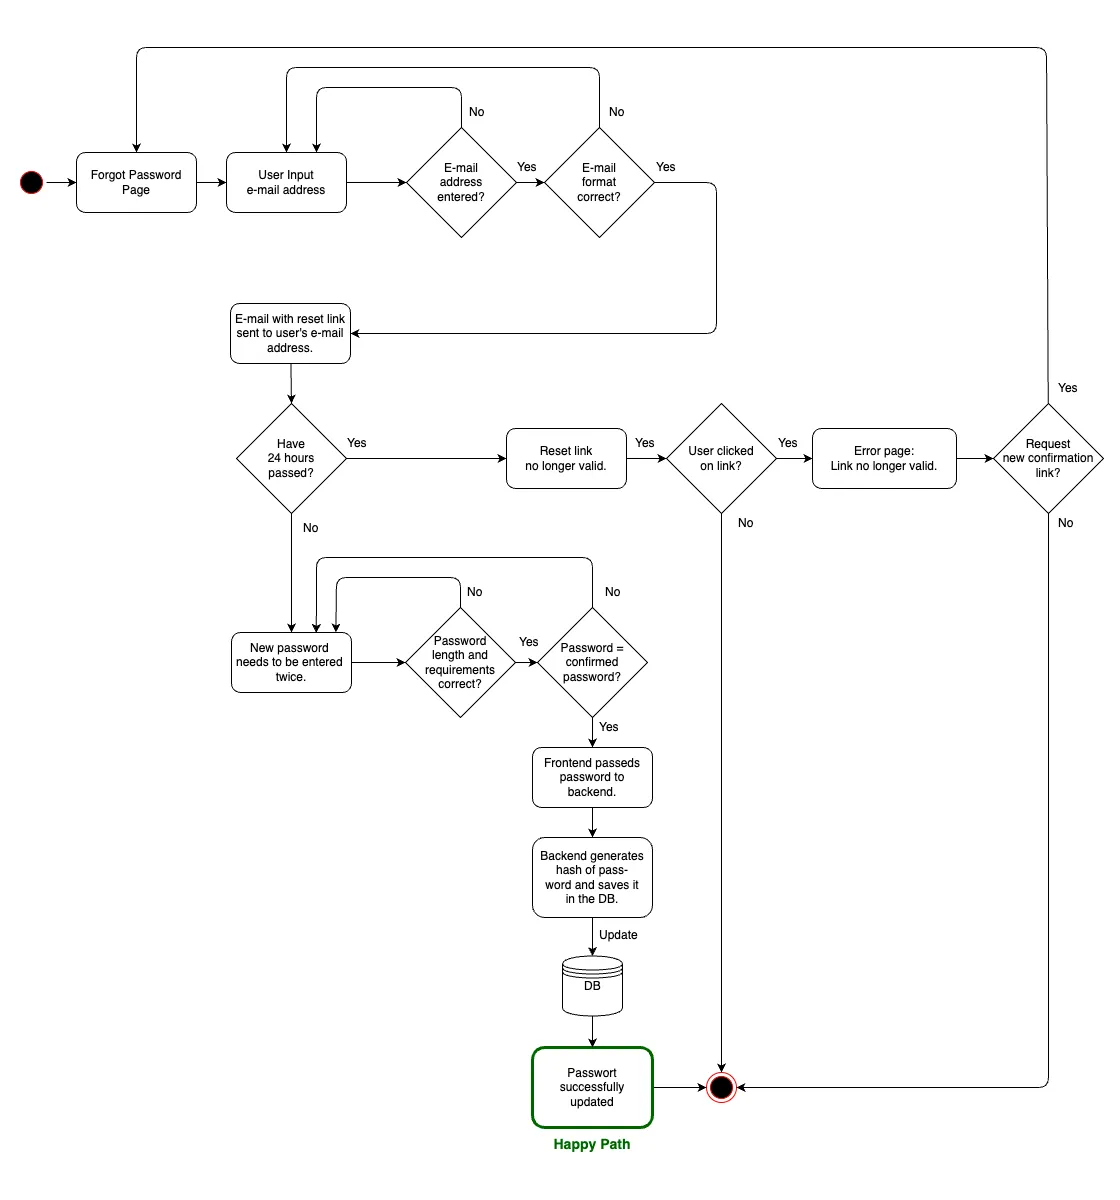
3. Forgot password
The user can request a new password if she has forgotten her old one. To do this, she must provide her email address. After entering the email address, a confirmation email will be sent to this email address. A new password can only be entered after clicking the confirmation link.
A. UI input: The user enters her email address.
B. Confirmation email: An email with a unique link will be sent to the specified address. This link is valid for 24 hours.
C. Forgotten password page: By clicking on the link in the email, the user is taken to a secure website where they can enter a new password. If the user clicks the link after the expiry of its validity, a page with an error message is displayed and the option is given to reset the password again.
D. Password change: After entering and confirming the new password, it is updated in the database (after hashing again).
Wireframes: Forgot password
Security Considerations
This registration/login process uses a JSON Web Token (JWT) for authentication, authorization and secure transfer of information. The token is stored in the client's LocalStorage and expires after 24 hours. The token is sent to the server with every request. The server checks the token and decides whether the request is allowed or not. If not, then the client will be redirected to the login page.
The steps of the JWT token process are included in the flowcharts.
Flowcharts
Flowchart: Registration
Flowchart: Login
Flowchart: Forgotten password
Out of Scope
This description only describes the registration of a standard user. The registration of an admin user is not discussed. This could, for example, contain additional information such as the role (admin) and permissions.
Furthermore, it is not described here whether an email could be sent to the user if the password was entered incorrectly several times to inform her or perhaps even to block the login for a while.
In addition, password changes are not explicitly discussed here. However, this would be similar to the password reset process.
An (Un)Expected Journey
In this exploration of user registration and authentication, it's evident that beneath the surface lies a world of intricacies and surprises. While I've had my share of insights, it's reassuring to know that in today's development landscape, there are frameworks and tools that take the heavy lifting out of these processes. So, while I appreciate the delightful complexities, we can also celebrate the convenience and efficiency that modern solutions bring to user registration and authentication where the obvious meets the ingenious.
Additional Files
The description and all the diagrams in their original draw.io format are available here in English and German on my Gitlab account. (I apologize for Gitlab, I personally prefer GitHub, but the course I attended required the use of Gitlab.)